

2020年06月25日
サバゲー用M24柄付き手榴弾 M24 Stick Grenades for Air-Soft(T238)
ドーモ、ジュリエットです。
まず最初にこちらの動画をご覧ください。
Domo, this is Juliette.
First of all, see this video.
何とかしてサバゲーで使える柄付き手榴弾を作れないかと考えて5年くらい・・
T238グレネードと出会ったことでその構想が一気に進みました。
キットの形で販売中ですので、興味のある方はDM等で連絡ください。
では購入者様向け組み立て方の説明に入ります。
用意していただくのはこんな感じです。
I've been trying to figure out how to make a stick grenade that can be used in Air-Soft for about 5 years...
When I met the T238 grenade, the idea went through the roof.
Now, let's go to the explanation of how to assemble the kit.
This is what you need to prepare.

左から
・ ハンマー&ピンポンチ(細い+ドライバー等でも可)
・ 六角レンチ(サイズ2.5)
・ たこ糸(1.2mm程度のもの)
・ イス足キャップ
・ 柄(外径34cm長さ28cmで内径1.5cm以上のパイプ、マイクロエース社のコンバットセットでも可)
・ T238グレネード
・ 3Dプリンタパーツ
From left to right.
Hammer and pin punch
Hexagonal wrench (size 2.5)
String (about 1.2mm)
Chair foot cap
handle (a pipe with an outer diameter of 34 cm and a length of 28 cm and an inner diameter of 1.5 cm or more. If you want you can purchase here)
T238 grenade.
3D printer parts
まずT238グレネードの安全ピンを外して起爆させます。
その後、上部にある3つのボルトを六角レンチで外して外せるパーツをすべて外します。
ボルトと、クリップ状のパーツは後から使います。
次に安全レバーの軸になっている棒をピンポンチで抜きます。
レバーは不要ですが、軸になっていた棒は使うのでなくさないようにしてください。
First, remove the safety pin on the T238 grenade to detonate it.
Then remove all the parts that can be removed by removing the three bolts at the top with an Allen wrench.
The bolts and the clip-like parts will be used later.
Next, use a pin punch to pull out the rod that is the shaft of the safety lever.
You don't need a lever, but don't lose the bar that was used as a shaft because you'll use it.

次に3Dプリンタパーツの安全装置にたこ糸を付けます。
つけ方は自由ですがハングマンズノットとかがきれいに取り付けられるような気がします。
The next step is to attach the string to the safety device of the 3D printer parts.
You can use any way you want, but I think Hangman's Knot or something like that can be used to attach it nicely.

安全装置をT238本体のレバーがあった場所に設置します。
設置したら『安全ピンを刺す方の穴』に先ほど外した安全レバーの軸を入れてください。
Install the safety device in the place where the lever on the main body of T238 was located.
Once installed, insert the shaft of the safety lever you removed earlier into the hole for the safety pin.

※図ではバーが出ていますが、完全に差し込んでください。
The bar is shown in the photo, but please insert it completely.
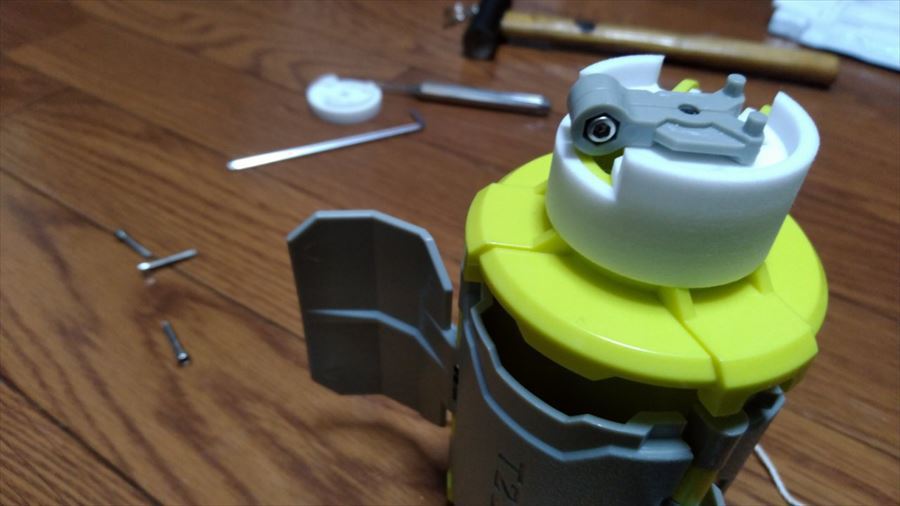
次に3Dプリンタのパーツを取り付けます。
下の写真で見えている部分が上です。
Next, install the 3D printer parts.
The part you see in the picture below is the top.

こんな感じで取り付けます。
Install it like this.

次に下部パーツに最初に取り外したクリップ状のパーツを取り付けます。
ネジは緩めておいた方が取り付けやすいですし、この後の作業が楽です。
Next, install the clip part you removed from the lower part first.
It's easier to loosen the screws to make the installation easier, and it's easier to work after this.

この時、クリップの六角ボルトの穴が切り欠き側にあるようにしてください。
向きを逆につけてしまうと、起爆時間の調整が出来なくなります。
At this time, make sure that the hole in the clip's hexagonal bolt is on the notch side.
If the direction is reversed, you will not be able to adjust the detonation time.
次のこの上部パーツを取り付けます。
Install this top part next.

こんな感じで、安全装置につけた紐が下から上に抜けるように通してください。
Pass it through like this so that the string attached to the safety device can be pulled out from the bottom to the top.

次に最初に外したボルトで上部パーツ、下部パーツを本体に取り付けます。
穴がきついので、入らない場合は押しながら回してください。
ボルトの頭が溝に完全に埋まるようにください。
Next, attach the upper part and the lower part to the main body with the bolts you removed first.
The hole is tight, so if it doesn't fit, push and turn it.
Please make sure that the head of the bolt is completely buried in the groove.

次に本体の羽根部分を格納して、上下から押さえつけます。
※写真を撮る都合から、爆発しないようにベルトを巻いてます。
Next, I retract the blades and press them down from above and below.
I put a belt around it to prevent it from exploding for the sake of taking pictures.

上下から押さえると、下からボルトが飛び出してきますので、これを押し込みます。
If you press down on it from above and below, the bolt will pop out from underneath, so push it in.

この時、ボルトの動きに合わせて、上にある灰色の円盤状の起爆装置が上下することがわかります。
ボルトを押す前 起爆装置が下がっている図
At this point, the gray disc-shaped detonator on top can be seen to move up and down as the bolt moves Before pressing the bolt
Before pressing the bolts Detonator in the lowered position

ボルトを押しこみ後 起爆装置が上がっている図
Detonator is raised after the bolt is pushed in.

起爆装置が上がったならば、安全装置を奥に押し込みます。
起爆装置の円盤が下がらないようにくさびを打ち込むような感じです。
Once the detonator is up, push the safety device into the back.
It's like driving a wedge into the detonator's disk to keep it from going down.

なお販売タイプの安全装置は操作しやすいように形を変えた関係で、起爆装置の上下が見えないかもしれませんが、手順は同じです。
これで撃発準備はできました。
紐を強く引けば安全装置が外れて、起爆装置が下がり、グレネードが作動します。
作動時間はクリップのボルトを締め付け具合で調整してください。
In addition, the safety devices for sale have been reshaped to make them easier to operate, so you can't see the top and bottom of the detonator. Maybe, but the procedure is the same.
You are now ready to fire.
If you pull the string hard, the safety is released, the detonator is lowered, and the grenade is activated.
Adjust the activation time by tightening the clip bolts.

次に柄に柄接続部を取り付けます。
柄接続部には4か所3mmの穴を開けてあります。
木ネジ、釘、接着剤などお好みの方法で柄に固定してください。
Next, attach the handle connection to the handle.
Four 3mm holes are drilled in the handle connection.
Attach to the handle using wood screws, nails, glue, or any other method you prefer.


本体の紐を柄に通します。
Thread the string of the body through the handle.

柄接続部と本体の上部のネジ部分を合体させます。
そして柄の反対の端にイス足キャップを取り付けたら完成です。
紐の握り玉?部分などはお好きな部品を使ってください。
塗装等も黒やフィールドグレイなど自分の考えるM24カラーにするのがよいでしょう。
Join the handle connection part and the top screw part of the body.
Then attach the chair foot cap to the other end of the handle and you're done.
A grip ball You can use your favorite parts.
It is better to use your own color such as black or field gray.

現在は柄とT238グレネードの供給が間に合っていないため、ツイッターでの受注販売をしております。
余剰が出来た時はラクマまたはメルカリで販売してます。
また、オプションで握り玉と底の部分をボトル缶キャップにするグレードアップパーツを販売中です。
フル装備するとこんな感じになります(未塗装ですが・・・)
Also, optional upgrade parts are now available to turn the grip ball and bottom part into a bottle can cap! It is.
This is what it looks like when fully equipped (unpainted...)


グレネードキット、補修パーツ等こちらで販売しております!
https://js-hardware.booth.pm/items/2587650
補足でBB弾の入れ方を説明します。
起爆した後、羽をたたみます。
※写真では撮影のためバンドをつけています。
I'll explain how to put the BB bullets in the supplement.
After detonation, fold the wings.
In the photo, a band is attached for the purpose of filming.

この状態で、底の部分(写真でいう左)だけを羽に噛ませて、上の部分(写真でいう右)の部分を60度ぐらいひねります。
そうすると上の部分に隙間が出来た状態で固定されますので、BB弾を入れることが出来ます。
In this state, only the bottom part (left in the picture) is chewed into the wings, and the top part (right in the picture) Twist the top of the grenade by about 60 degrees.
Then, it will be fixed with a gap at the top, so you can put a BB bullet in it.

あとは上で書いたとおり、
・上下を抑える
・下から飛び出たボルトを押し上げる
・安全装置を噛ませる
これで再度使用できるようになります。
The rest, as I wrote above.
Hold up and down.
Push up the bolts that protrude from the bottom.
I'll bite the safety device.
Now you can use it again.
★ワイヤー式にする場合★
エンリケさん(@seburo47)が安全装置解除用のたこ紐をワイヤー式にしておりましたので、こちらについても紹介したいと思います。
If you want to use the wire method
Enrique (@seburo47) had a wired string for the safety release. So I'd like to introduce this one as well.

用意したのはこちら
・ 1mm径のワイヤーロープ https://www.monotaro.com/p/1749/3263/?displayId=5
・ ワイヤーローブスリーブ https://www.monotaro.com/p/0354/5997/?displayId=5
・ ジュラコンスペーサー https://www.monotaro.com/p/4294/3031/?displayId=5
まず安全装置にワイヤーを通します。
Here's what I've prepared.
1mm diameter wire rope https://www.monotaro.com/p/ 1749/3263/?displayId=5
Wire lobe sleeve https://www.monotaro.com/p/0354 /5997/?displayId=5
DURACON Spacer https://www.monotaro.com/p/4294/ 3031/?displayId=5
The first step is to run the wire through the safety device.

スリーブでカシメて固定します。
Caulk with a sleeve to secure it in place.

ワイヤーの長さをこれくらいで一度切ります。
Cut the length of the wire once about this long.

本体にピンを取り付ける際にジュラコンスペーサーをつけます。
The DURACON spacers are attached to the main body when installing the pins.

通常の手順で組み立てた後、底部から出ているワイヤーでわっかを作ります。
After assembling it in the usual way, make a ring with the wires from the bottom.

握り玉にこういう感じで紐を取り付けます。
Attach the string to the grip ball like this.

握り玉の紐を先ほど作ったわっかに同じ形で取り付けます。
Attach the string of the grip ball to the ring you just made in the same way.

ワイヤーのわっかはギリギリで作った方が外から見えないのでいいかなぁと思います。
I think it would be better to make the wire ring at the edge so it won't be visible from the outside.

★作例集について★
こちらの記事で他の方が仕上げた柄付き手榴弾を紹介しています。
ステンシルを入れたり表面の文字を消したり、個性の光る作品がありますので是非ご覧ください。
https://jshardware.militaryblog.jp/e1032841.html
About the Example Collection
You can see some of the patterned grenades that others have finished here.
Please take a look at the stencils, erase the text on the surface, and other unique pieces! .
https://jshardware.militaryblog.jp/e1032841 .html
★トラブルシューティング★
1 安全装置と起爆円盤の関係について
下の図のような形で入ります。
たぶん無理だとは思いますが、赤丸の押す部分まで入れようとしないでください。
Troubleshooting
1 The relationship between safety devices and detonating disks
It goes in as shown in the diagram below.
You probably can't do it, but don't try to get in until you get to the part of the red circle that you press.

2 安全装置が固すぎて紐で起爆できない
3Dプリントの誤差&T238の製造誤差で赤丸部分の余裕がないことが原因です。
2 The safety device is too hard to detonate with a string.
This is due to a 3D printing error & T238 manufacturing error, and there is no room for the red circled area.

その場合の対処法は以下の通りです。どちらかで隙間を作ることで解決します。
(1)1で示した安全装置の押す部分上面をやすり等で削る。
(2)下の写真のようにT238本体と下部パーツの間にM3ワッシャーを噛ませる。
If this is the case, here's what to do You can solve this problem by making a gap with either of the following methods.
(1)Scrape off the upper surface of the safety device pushing part shown in 1.
(2)Insert the M3 washer between the T238 body and the lower part as shown in the picture below.

まず最初にこちらの動画をご覧ください。
Domo, this is Juliette.
First of all, see this video.
何とかしてサバゲーで使える柄付き手榴弾を作れないかと考えて5年くらい・・
T238グレネードと出会ったことでその構想が一気に進みました。
キットの形で販売中ですので、興味のある方はDM等で連絡ください。
では購入者様向け組み立て方の説明に入ります。
用意していただくのはこんな感じです。
I've been trying to figure out how to make a stick grenade that can be used in Air-Soft for about 5 years...
When I met the T238 grenade, the idea went through the roof.
Now, let's go to the explanation of how to assemble the kit.
This is what you need to prepare.

左から
・ ハンマー&ピンポンチ(細い+ドライバー等でも可)
・ 六角レンチ(サイズ2.5)
・ たこ糸(1.2mm程度のもの)
・ イス足キャップ
・ 柄(外径34cm長さ28cmで内径1.5cm以上のパイプ、マイクロエース社のコンバットセットでも可)
・ T238グレネード
・ 3Dプリンタパーツ
From left to right.
Hammer and pin punch
Hexagonal wrench (size 2.5)
String (about 1.2mm)
Chair foot cap
handle (a pipe with an outer diameter of 34 cm and a length of 28 cm and an inner diameter of 1.5 cm or more. If you want you can purchase here)
T238 grenade.
3D printer parts
まずT238グレネードの安全ピンを外して起爆させます。
その後、上部にある3つのボルトを六角レンチで外して外せるパーツをすべて外します。
ボルトと、クリップ状のパーツは後から使います。
次に安全レバーの軸になっている棒をピンポンチで抜きます。
レバーは不要ですが、軸になっていた棒は使うのでなくさないようにしてください。
First, remove the safety pin on the T238 grenade to detonate it.
Then remove all the parts that can be removed by removing the three bolts at the top with an Allen wrench.
The bolts and the clip-like parts will be used later.
Next, use a pin punch to pull out the rod that is the shaft of the safety lever.
You don't need a lever, but don't lose the bar that was used as a shaft because you'll use it.

次に3Dプリンタパーツの安全装置にたこ糸を付けます。
つけ方は自由ですがハングマンズノットとかがきれいに取り付けられるような気がします。
The next step is to attach the string to the safety device of the 3D printer parts.
You can use any way you want, but I think Hangman's Knot or something like that can be used to attach it nicely.

安全装置をT238本体のレバーがあった場所に設置します。
設置したら『安全ピンを刺す方の穴』に先ほど外した安全レバーの軸を入れてください。
Install the safety device in the place where the lever on the main body of T238 was located.
Once installed, insert the shaft of the safety lever you removed earlier into the hole for the safety pin.

※図ではバーが出ていますが、完全に差し込んでください。
The bar is shown in the photo, but please insert it completely.
次に3Dプリンタのパーツを取り付けます。
下の写真で見えている部分が上です。
Next, install the 3D printer parts.
The part you see in the picture below is the top.

こんな感じで取り付けます。
Install it like this.

次に下部パーツに最初に取り外したクリップ状のパーツを取り付けます。
ネジは緩めておいた方が取り付けやすいですし、この後の作業が楽です。
Next, install the clip part you removed from the lower part first.
It's easier to loosen the screws to make the installation easier, and it's easier to work after this.

この時、クリップの六角ボルトの穴が切り欠き側にあるようにしてください。
向きを逆につけてしまうと、起爆時間の調整が出来なくなります。
At this time, make sure that the hole in the clip's hexagonal bolt is on the notch side.
If the direction is reversed, you will not be able to adjust the detonation time.

次のこの上部パーツを取り付けます。
Install this top part next.

こんな感じで、安全装置につけた紐が下から上に抜けるように通してください。
Pass it through like this so that the string attached to the safety device can be pulled out from the bottom to the top.

次に最初に外したボルトで上部パーツ、下部パーツを本体に取り付けます。
穴がきついので、入らない場合は押しながら回してください。
ボルトの頭が溝に完全に埋まるようにください。
Next, attach the upper part and the lower part to the main body with the bolts you removed first.
The hole is tight, so if it doesn't fit, push and turn it.
Please make sure that the head of the bolt is completely buried in the groove.

次に本体の羽根部分を格納して、上下から押さえつけます。
※写真を撮る都合から、爆発しないようにベルトを巻いてます。
Next, I retract the blades and press them down from above and below.
I put a belt around it to prevent it from exploding for the sake of taking pictures.

上下から押さえると、下からボルトが飛び出してきますので、これを押し込みます。
If you press down on it from above and below, the bolt will pop out from underneath, so push it in.

この時、ボルトの動きに合わせて、上にある灰色の円盤状の起爆装置が上下することがわかります。
ボルトを押す前 起爆装置が下がっている図
At this point, the gray disc-shaped detonator on top can be seen to move up and down as the bolt moves Before pressing the bolt
Before pressing the bolts Detonator in the lowered position

ボルトを押しこみ後 起爆装置が上がっている図
Detonator is raised after the bolt is pushed in.

起爆装置が上がったならば、安全装置を奥に押し込みます。
起爆装置の円盤が下がらないようにくさびを打ち込むような感じです。
Once the detonator is up, push the safety device into the back.
It's like driving a wedge into the detonator's disk to keep it from going down.

なお販売タイプの安全装置は操作しやすいように形を変えた関係で、起爆装置の上下が見えないかもしれませんが、手順は同じです。
これで撃発準備はできました。
紐を強く引けば安全装置が外れて、起爆装置が下がり、グレネードが作動します。
作動時間はクリップのボルトを締め付け具合で調整してください。
In addition, the safety devices for sale have been reshaped to make them easier to operate, so you can't see the top and bottom of the detonator. Maybe, but the procedure is the same.
You are now ready to fire.
If you pull the string hard, the safety is released, the detonator is lowered, and the grenade is activated.
Adjust the activation time by tightening the clip bolts.

次に柄に柄接続部を取り付けます。
柄接続部には4か所3mmの穴を開けてあります。
木ネジ、釘、接着剤などお好みの方法で柄に固定してください。
Next, attach the handle connection to the handle.
Four 3mm holes are drilled in the handle connection.
Attach to the handle using wood screws, nails, glue, or any other method you prefer.


本体の紐を柄に通します。
Thread the string of the body through the handle.

柄接続部と本体の上部のネジ部分を合体させます。
そして柄の反対の端にイス足キャップを取り付けたら完成です。
紐の握り玉?部分などはお好きな部品を使ってください。
塗装等も黒やフィールドグレイなど自分の考えるM24カラーにするのがよいでしょう。
Join the handle connection part and the top screw part of the body.
Then attach the chair foot cap to the other end of the handle and you're done.
A grip ball You can use your favorite parts.
It is better to use your own color such as black or field gray.

現在は柄とT238グレネードの供給が間に合っていないため、ツイッターでの受注販売をしております。
余剰が出来た時はラクマまたはメルカリで販売してます。
また、オプションで握り玉と底の部分をボトル缶キャップにするグレードアップパーツを販売中です。
フル装備するとこんな感じになります(未塗装ですが・・・)
Also, optional upgrade parts are now available to turn the grip ball and bottom part into a bottle can cap! It is.
This is what it looks like when fully equipped (unpainted...)


グレネードキット、補修パーツ等こちらで販売しております!
https://js-hardware.booth.pm/items/2587650
補足でBB弾の入れ方を説明します。
起爆した後、羽をたたみます。
※写真では撮影のためバンドをつけています。
I'll explain how to put the BB bullets in the supplement.
After detonation, fold the wings.
In the photo, a band is attached for the purpose of filming.

この状態で、底の部分(写真でいう左)だけを羽に噛ませて、上の部分(写真でいう右)の部分を60度ぐらいひねります。
そうすると上の部分に隙間が出来た状態で固定されますので、BB弾を入れることが出来ます。
In this state, only the bottom part (left in the picture) is chewed into the wings, and the top part (right in the picture) Twist the top of the grenade by about 60 degrees.
Then, it will be fixed with a gap at the top, so you can put a BB bullet in it.

あとは上で書いたとおり、
・上下を抑える
・下から飛び出たボルトを押し上げる
・安全装置を噛ませる
これで再度使用できるようになります。
The rest, as I wrote above.
Hold up and down.
Push up the bolts that protrude from the bottom.
I'll bite the safety device.
Now you can use it again.
★ワイヤー式にする場合★
エンリケさん(@seburo47)が安全装置解除用のたこ紐をワイヤー式にしておりましたので、こちらについても紹介したいと思います。
If you want to use the wire method
Enrique (@seburo47) had a wired string for the safety release. So I'd like to introduce this one as well.

用意したのはこちら
・ 1mm径のワイヤーロープ https://www.monotaro.com/p/1749/3263/?displayId=5
・ ワイヤーローブスリーブ https://www.monotaro.com/p/0354/5997/?displayId=5
・ ジュラコンスペーサー https://www.monotaro.com/p/4294/3031/?displayId=5
まず安全装置にワイヤーを通します。
Here's what I've prepared.
1mm diameter wire rope https://www.monotaro.com/p/ 1749/3263/?displayId=5
Wire lobe sleeve https://www.monotaro.com/p/0354 /5997/?displayId=5
DURACON Spacer https://www.monotaro.com/p/4294/ 3031/?displayId=5
The first step is to run the wire through the safety device.

スリーブでカシメて固定します。
Caulk with a sleeve to secure it in place.

ワイヤーの長さをこれくらいで一度切ります。
Cut the length of the wire once about this long.

本体にピンを取り付ける際にジュラコンスペーサーをつけます。
The DURACON spacers are attached to the main body when installing the pins.

通常の手順で組み立てた後、底部から出ているワイヤーでわっかを作ります。
After assembling it in the usual way, make a ring with the wires from the bottom.

握り玉にこういう感じで紐を取り付けます。
Attach the string to the grip ball like this.

握り玉の紐を先ほど作ったわっかに同じ形で取り付けます。
Attach the string of the grip ball to the ring you just made in the same way.

ワイヤーのわっかはギリギリで作った方が外から見えないのでいいかなぁと思います。
I think it would be better to make the wire ring at the edge so it won't be visible from the outside.

★作例集について★
こちらの記事で他の方が仕上げた柄付き手榴弾を紹介しています。
ステンシルを入れたり表面の文字を消したり、個性の光る作品がありますので是非ご覧ください。
https://jshardware.militaryblog.jp/e1032841.html
About the Example Collection
You can see some of the patterned grenades that others have finished here.
Please take a look at the stencils, erase the text on the surface, and other unique pieces! .
https://jshardware.militaryblog.jp/e1032841 .html
★トラブルシューティング★
1 安全装置と起爆円盤の関係について
下の図のような形で入ります。
たぶん無理だとは思いますが、赤丸の押す部分まで入れようとしないでください。
Troubleshooting
1 The relationship between safety devices and detonating disks
It goes in as shown in the diagram below.
You probably can't do it, but don't try to get in until you get to the part of the red circle that you press.

2 安全装置が固すぎて紐で起爆できない
3Dプリントの誤差&T238の製造誤差で赤丸部分の余裕がないことが原因です。
2 The safety device is too hard to detonate with a string.
This is due to a 3D printing error & T238 manufacturing error, and there is no room for the red circled area.

その場合の対処法は以下の通りです。どちらかで隙間を作ることで解決します。
(1)1で示した安全装置の押す部分上面をやすり等で削る。
(2)下の写真のようにT238本体と下部パーツの間にM3ワッシャーを噛ませる。
If this is the case, here's what to do You can solve this problem by making a gap with either of the following methods.
(1)Scrape off the upper surface of the safety device pushing part shown in 1.
(2)Insert the M3 washer between the T238 body and the lower part as shown in the picture below.

2020年06月17日
RGD-33 ヤオ・リー柄付き手榴弾について
ドーモ、ジュリエットです。
以前ツイッターで紹介した、中国製柄付き手榴弾がついに届きました!

元のツイート⇒https://twitter.com/JS_Hardware/status/1266122868888236033
袋には使い方が印刷されています。
届いてみた感想は「あれ、小さくない・・・?」
試しに我が家にある手榴弾たちと比べてみました。

左から
T238グレネード
GR02グレネード(柄付き改造パーツ付き)
RGD-33 ヤオ・リー手榴弾
T238 日本軍式手榴弾
T238 M24柄付き手榴弾
やっぱりめちゃくちゃ小さいです。
寸法を測ってみました。

長さは15cmくらい(ちなみに底部の黒い部分は塗分けてあるだけで外れません)

弾頭長さが6cmくらい

弾頭直径が4.8cm

柄の直径が2.5cm

起爆状態で直径15cmくらい
こんな感じです。

重さは100gです
構造はほとんどGR02グレネードと同じです。

弾頭部から弾を入れられます。何発入るかは未確認です。

安全装置はこんな感じ。

ピンを抜くとタブみたいな部分が動くようになり、中の鉄球の固定が解除されて起爆可能になります。
次に分解してみます。

3つのネジを外すと柄の部分が外れます。柄はもちろん中空です。
新たに3つのネジが現れます。ほとんどGR02グレネードの小型版であることがわかります。

このネジも外すと弾頭上部が取り外せます。安全装置の鉄球構造もGR02と全く同じです。

ここからスプリングつきの羽根が外せますが、以後は省略します。
BB弾は入れていないですが起爆させた動画はこちらのツイートをご覧ください。
https://twitter.com/JS_Hardware/status/1273227128356519936
この手榴弾を見つけた時は「ついに中国様が柄付き手榴弾業界に進出された!」と衝撃を受け、
しかも「赤軍勢」「ナム勢」向けのチョイスもなかなか鋭いと思っていました。
これはもうわが兵器局の柄付き手榴弾事業はおしまいだなと覚悟もしていました。
ただ届いたRGD-33 ヤオ・リー手榴弾はちょっと小さくて、価格相応のチープさは否めないものです。
リアルウッドでもっと重厚な手榴弾をご希望の方はぜひ当兵器局のM24グレネードをご検討下さい!(宣伝)
M24柄付き手榴弾(時限式)⇒https://jshardware.militaryblog.jp/e1019823.html
M24柄付き手榴弾(インパクト式)⇒https://jshardware.militaryblog.jp/e1026753.html
それでは~