

2024年01月14日
サバゲー用火炎瓶型グレネードキット
ドーモ、ジュリエットです!
久しぶりにグレネードを開発しました!
これまでは軍装勢用でしたが、今回は非正規な集団や世紀末な方々の方が似合うかなと思います。
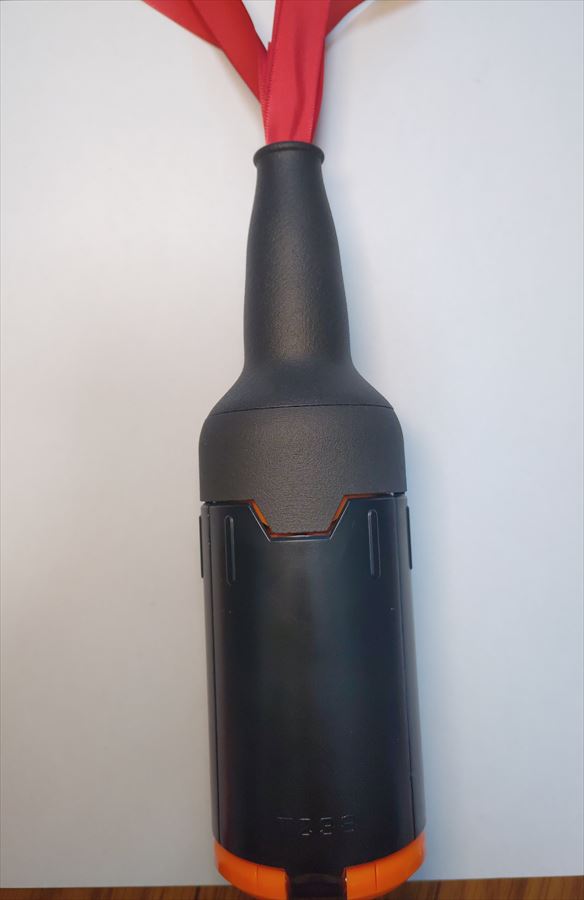
火炎瓶型グレネードです!
【必要なもの】
● 3Dプリンタ製パーツ
● GR02グレネード
● M3×20 キャップボルト×3
● 紐
● 赤いリボンや布等

【組み立て手順】
1 3Dプリンタパーツのチェック
今回のパーツはランナーで接続して出力している関係でバリが残っている箇所があります。
見つけた場合はニッパー等で切り、必要に応じてヤスリがけして下さい。
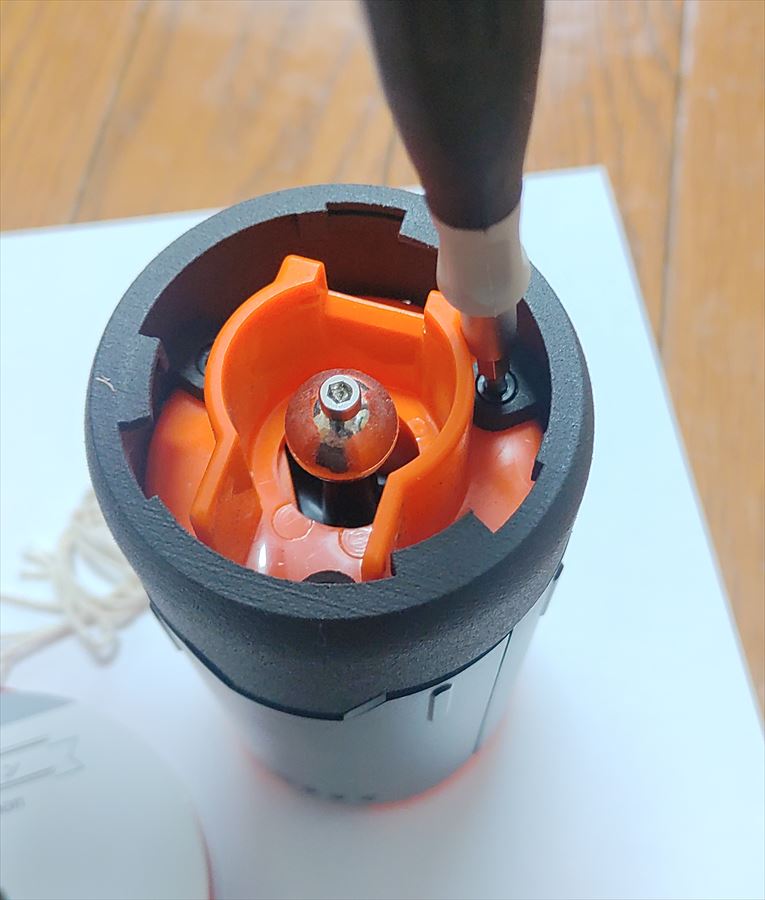
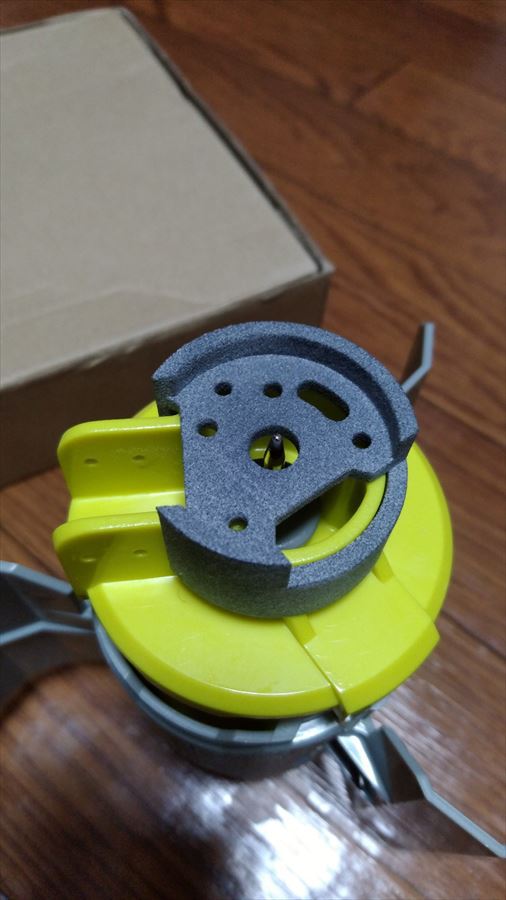
2 GR02グレネードの処理
ピンポンチを使ってレバーを外して下さい。
その後、本体上部の3つのネジを外します。
外し終わったら図のように3Dプリンタ製パーツの下部をM3×20のキャップボルトで留めます。
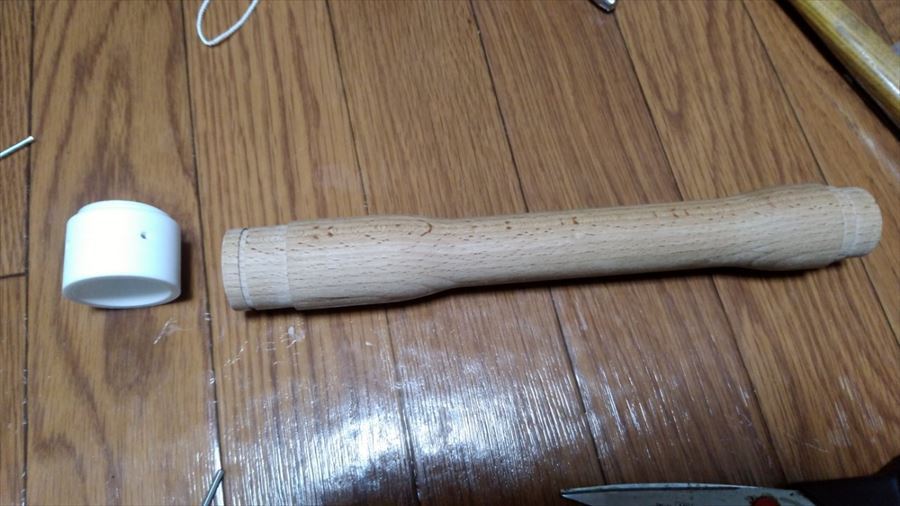
3 リボンの準備
リボンを適当な長さに切ったものを用意します。
長さや本数は自由ですし、布等を使ってもいいと思います。
火炎っぽい感じに出来ればなおよいです。

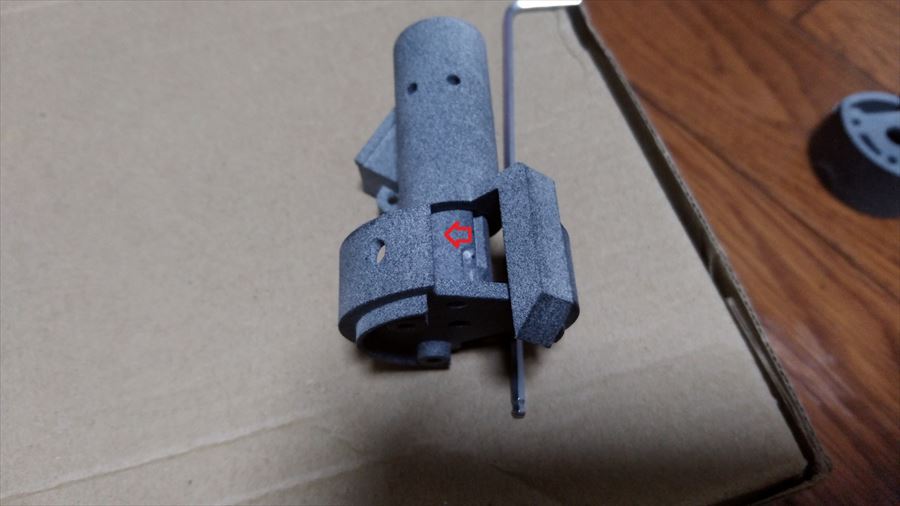
4 安全装置の抜け止めリング取り付け
安全装置の溝に付属の抜け止めリングを取りつけます。

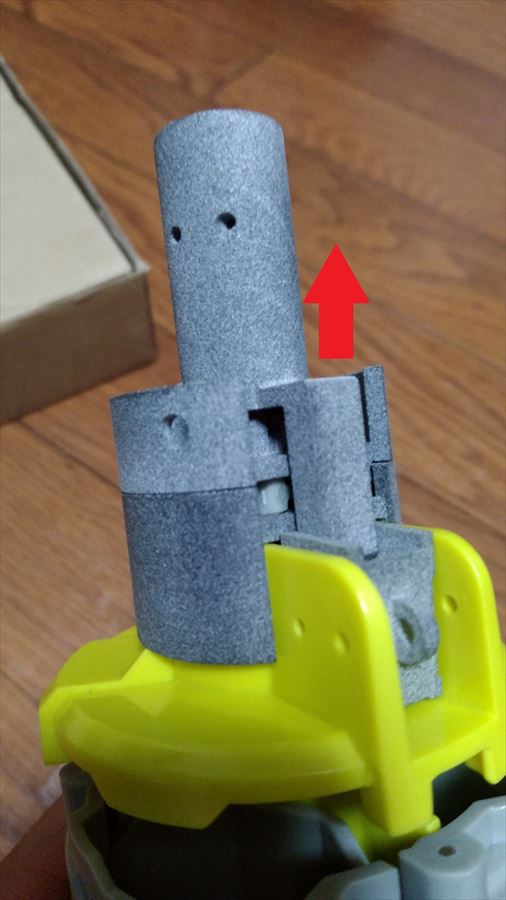
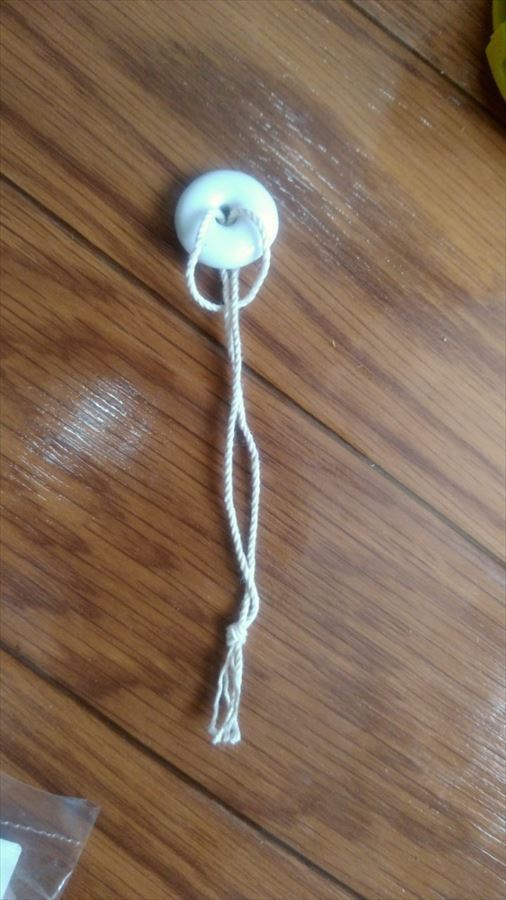
5 紐通し
3Dプリンタパーツの下側から紐を通します。
ある程度入れたらしたから息を吹き込むとビンの口部分から出てくると思います。難しければクリーニングロッドを使って下さい。

6 リボンの取り付け
次にビンの口側から出ている紐に先ほど用意したリボンを結びつけます。
強く引っ張るのでしっかり結んで下さい。

リボンを結び終えたら下側から紐を引っ張り、リボンを上部に引き込みます。
これをやっておかないと、安全装置解除時に紐が見えてかっこ悪いことになります。

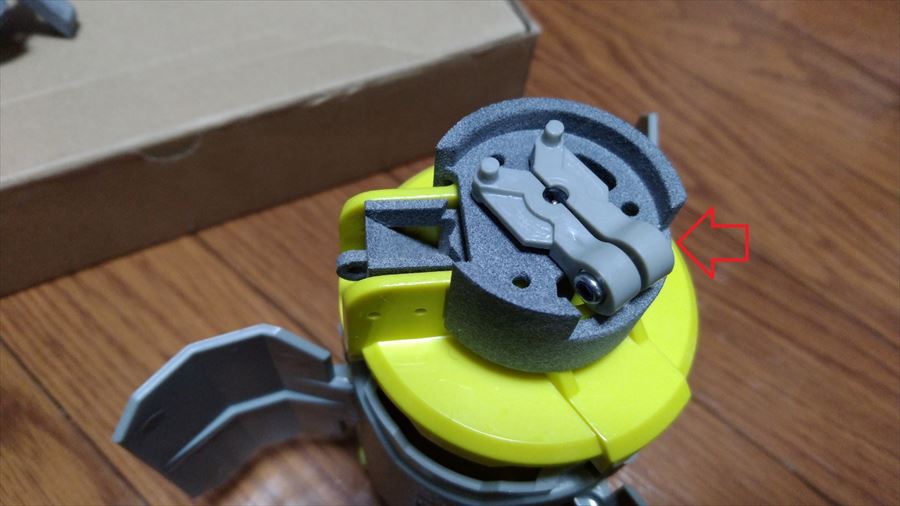
7 安全装置の取り付け
ある程度引き込んだところで安全装置の穴に紐を結びます。
こちらもほどけないようにしっかり結びましょう。
余った紐はカットして下さい。

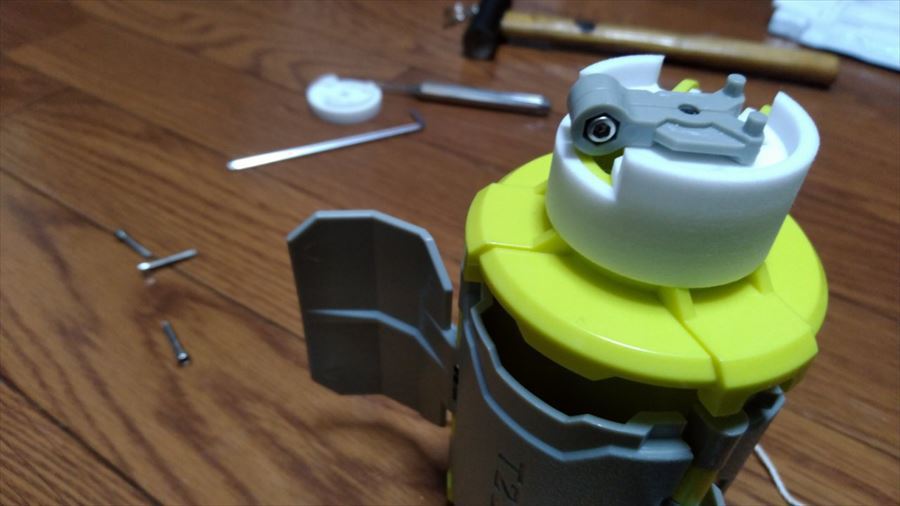
8 安全装置のスタンバイ
リボンを軽く引き、写真のように安全装置の出っ張りが引っかかった状態にします。

9 合体
この状態で最初に組み立てた下部に差し込み、時計回りに回してロックしたら準備完了です!

ロックは結構固めです。固すぎる場合は上部パーツの赤く塗った部分を削って調整して下さい。

10 起爆
リボンを引っ張り、カチッとした感覚があれば起爆準備完了です!
衝撃により起爆します。
11 再装填
上部を反時計回りに回して外し、安全装置を指で引きだして下さい。
あとは5と同じです。

12 販売等
以上のパーツは下記サイトで販売しております。
https://js-hardware.booth.pm/items/5424868
気になった方は是非一度見てみてください!
久しぶりにグレネードを開発しました!
これまでは軍装勢用でしたが、今回は非正規な集団や世紀末な方々の方が似合うかなと思います。
火炎瓶型グレネードです!

【必要なもの】
● 3Dプリンタ製パーツ
● GR02グレネード
● M3×20 キャップボルト×3
● 紐
● 赤いリボンや布等

【組み立て手順】
1 3Dプリンタパーツのチェック
今回のパーツはランナーで接続して出力している関係でバリが残っている箇所があります。
見つけた場合はニッパー等で切り、必要に応じてヤスリがけして下さい。
2 GR02グレネードの処理
ピンポンチを使ってレバーを外して下さい。
その後、本体上部の3つのネジを外します。
外し終わったら図のように3Dプリンタ製パーツの下部をM3×20のキャップボルトで留めます。

3 リボンの準備
リボンを適当な長さに切ったものを用意します。
長さや本数は自由ですし、布等を使ってもいいと思います。
火炎っぽい感じに出来ればなおよいです。

4 安全装置の抜け止めリング取り付け
安全装置の溝に付属の抜け止めリングを取りつけます。

5 紐通し
3Dプリンタパーツの下側から紐を通します。
ある程度入れたらしたから息を吹き込むとビンの口部分から出てくると思います。難しければクリーニングロッドを使って下さい。

6 リボンの取り付け
次にビンの口側から出ている紐に先ほど用意したリボンを結びつけます。
強く引っ張るのでしっかり結んで下さい。

リボンを結び終えたら下側から紐を引っ張り、リボンを上部に引き込みます。
これをやっておかないと、安全装置解除時に紐が見えてかっこ悪いことになります。

7 安全装置の取り付け
ある程度引き込んだところで安全装置の穴に紐を結びます。
こちらもほどけないようにしっかり結びましょう。
余った紐はカットして下さい。

8 安全装置のスタンバイ
リボンを軽く引き、写真のように安全装置の出っ張りが引っかかった状態にします。

9 合体
この状態で最初に組み立てた下部に差し込み、時計回りに回してロックしたら準備完了です!

ロックは結構固めです。固すぎる場合は上部パーツの赤く塗った部分を削って調整して下さい。

10 起爆
リボンを引っ張り、カチッとした感覚があれば起爆準備完了です!
衝撃により起爆します。
11 再装填
上部を反時計回りに回して外し、安全装置を指で引きだして下さい。
あとは5と同じです。

12 販売等
以上のパーツは下記サイトで販売しております。
https://js-hardware.booth.pm/items/5424868
気になった方は是非一度見てみてください!
2020年06月25日
サバゲー用M24柄付き手榴弾 M24 Stick Grenades for Air-Soft(T238)
ドーモ、ジュリエットです。
まず最初にこちらの動画をご覧ください。
Domo, this is Juliette.
First of all, see this video.
何とかしてサバゲーで使える柄付き手榴弾を作れないかと考えて5年くらい・・
T238グレネードと出会ったことでその構想が一気に進みました。
キットの形で販売中ですので、興味のある方はDM等で連絡ください。
では購入者様向け組み立て方の説明に入ります。
用意していただくのはこんな感じです。
I've been trying to figure out how to make a stick grenade that can be used in Air-Soft for about 5 years...
When I met the T238 grenade, the idea went through the roof.
Now, let's go to the explanation of how to assemble the kit.
This is what you need to prepare.

左から
・ ハンマー&ピンポンチ(細い+ドライバー等でも可)
・ 六角レンチ(サイズ2.5)
・ たこ糸(1.2mm程度のもの)
・ イス足キャップ
・ 柄(外径34cm長さ28cmで内径1.5cm以上のパイプ、マイクロエース社のコンバットセットでも可)
・ T238グレネード
・ 3Dプリンタパーツ
From left to right.
Hammer and pin punch
Hexagonal wrench (size 2.5)
String (about 1.2mm)
Chair foot cap
handle (a pipe with an outer diameter of 34 cm and a length of 28 cm and an inner diameter of 1.5 cm or more. If you want you can purchase here)
T238 grenade.
3D printer parts
まずT238グレネードの安全ピンを外して起爆させます。
その後、上部にある3つのボルトを六角レンチで外して外せるパーツをすべて外します。
ボルトと、クリップ状のパーツは後から使います。
次に安全レバーの軸になっている棒をピンポンチで抜きます。
レバーは不要ですが、軸になっていた棒は使うのでなくさないようにしてください。
First, remove the safety pin on the T238 grenade to detonate it.
Then remove all the parts that can be removed by removing the three bolts at the top with an Allen wrench.
The bolts and the clip-like parts will be used later.
Next, use a pin punch to pull out the rod that is the shaft of the safety lever.
You don't need a lever, but don't lose the bar that was used as a shaft because you'll use it.

次に3Dプリンタパーツの安全装置にたこ糸を付けます。
つけ方は自由ですがハングマンズノットとかがきれいに取り付けられるような気がします。
The next step is to attach the string to the safety device of the 3D printer parts.
You can use any way you want, but I think Hangman's Knot or something like that can be used to attach it nicely.

安全装置をT238本体のレバーがあった場所に設置します。
設置したら『安全ピンを刺す方の穴』に先ほど外した安全レバーの軸を入れてください。
Install the safety device in the place where the lever on the main body of T238 was located.
Once installed, insert the shaft of the safety lever you removed earlier into the hole for the safety pin.

※図ではバーが出ていますが、完全に差し込んでください。
The bar is shown in the photo, but please insert it completely.
次に3Dプリンタのパーツを取り付けます。
下の写真で見えている部分が上です。
Next, install the 3D printer parts.
The part you see in the picture below is the top.

こんな感じで取り付けます。
Install it like this.

次に下部パーツに最初に取り外したクリップ状のパーツを取り付けます。
ネジは緩めておいた方が取り付けやすいですし、この後の作業が楽です。
Next, install the clip part you removed from the lower part first.
It's easier to loosen the screws to make the installation easier, and it's easier to work after this.

この時、クリップの六角ボルトの穴が切り欠き側にあるようにしてください。
向きを逆につけてしまうと、起爆時間の調整が出来なくなります。
At this time, make sure that the hole in the clip's hexagonal bolt is on the notch side.
If the direction is reversed, you will not be able to adjust the detonation time.
次のこの上部パーツを取り付けます。
Install this top part next.

こんな感じで、安全装置につけた紐が下から上に抜けるように通してください。
Pass it through like this so that the string attached to the safety device can be pulled out from the bottom to the top.

次に最初に外したボルトで上部パーツ、下部パーツを本体に取り付けます。
穴がきついので、入らない場合は押しながら回してください。
ボルトの頭が溝に完全に埋まるようにください。
Next, attach the upper part and the lower part to the main body with the bolts you removed first.
The hole is tight, so if it doesn't fit, push and turn it.
Please make sure that the head of the bolt is completely buried in the groove.

次に本体の羽根部分を格納して、上下から押さえつけます。
※写真を撮る都合から、爆発しないようにベルトを巻いてます。
Next, I retract the blades and press them down from above and below.
I put a belt around it to prevent it from exploding for the sake of taking pictures.

上下から押さえると、下からボルトが飛び出してきますので、これを押し込みます。
If you press down on it from above and below, the bolt will pop out from underneath, so push it in.

この時、ボルトの動きに合わせて、上にある灰色の円盤状の起爆装置が上下することがわかります。
ボルトを押す前 起爆装置が下がっている図
At this point, the gray disc-shaped detonator on top can be seen to move up and down as the bolt moves Before pressing the bolt
Before pressing the bolts Detonator in the lowered position

ボルトを押しこみ後 起爆装置が上がっている図
Detonator is raised after the bolt is pushed in.

起爆装置が上がったならば、安全装置を奥に押し込みます。
起爆装置の円盤が下がらないようにくさびを打ち込むような感じです。
Once the detonator is up, push the safety device into the back.
It's like driving a wedge into the detonator's disk to keep it from going down.

なお販売タイプの安全装置は操作しやすいように形を変えた関係で、起爆装置の上下が見えないかもしれませんが、手順は同じです。
これで撃発準備はできました。
紐を強く引けば安全装置が外れて、起爆装置が下がり、グレネードが作動します。
作動時間はクリップのボルトを締め付け具合で調整してください。
In addition, the safety devices for sale have been reshaped to make them easier to operate, so you can't see the top and bottom of the detonator. Maybe, but the procedure is the same.
You are now ready to fire.
If you pull the string hard, the safety is released, the detonator is lowered, and the grenade is activated.
Adjust the activation time by tightening the clip bolts.

次に柄に柄接続部を取り付けます。
柄接続部には4か所3mmの穴を開けてあります。
木ネジ、釘、接着剤などお好みの方法で柄に固定してください。
Next, attach the handle connection to the handle.
Four 3mm holes are drilled in the handle connection.
Attach to the handle using wood screws, nails, glue, or any other method you prefer.


本体の紐を柄に通します。
Thread the string of the body through the handle.

柄接続部と本体の上部のネジ部分を合体させます。
そして柄の反対の端にイス足キャップを取り付けたら完成です。
紐の握り玉?部分などはお好きな部品を使ってください。
塗装等も黒やフィールドグレイなど自分の考えるM24カラーにするのがよいでしょう。
Join the handle connection part and the top screw part of the body.
Then attach the chair foot cap to the other end of the handle and you're done.
A grip ball You can use your favorite parts.
It is better to use your own color such as black or field gray.

現在は柄とT238グレネードの供給が間に合っていないため、ツイッターでの受注販売をしております。
余剰が出来た時はラクマまたはメルカリで販売してます。
また、オプションで握り玉と底の部分をボトル缶キャップにするグレードアップパーツを販売中です。
フル装備するとこんな感じになります(未塗装ですが・・・)
Also, optional upgrade parts are now available to turn the grip ball and bottom part into a bottle can cap! It is.
This is what it looks like when fully equipped (unpainted...)


グレネードキット、補修パーツ等こちらで販売しております!
https://js-hardware.booth.pm/items/2587650
補足でBB弾の入れ方を説明します。
起爆した後、羽をたたみます。
※写真では撮影のためバンドをつけています。
I'll explain how to put the BB bullets in the supplement.
After detonation, fold the wings.
In the photo, a band is attached for the purpose of filming.

この状態で、底の部分(写真でいう左)だけを羽に噛ませて、上の部分(写真でいう右)の部分を60度ぐらいひねります。
そうすると上の部分に隙間が出来た状態で固定されますので、BB弾を入れることが出来ます。
In this state, only the bottom part (left in the picture) is chewed into the wings, and the top part (right in the picture) Twist the top of the grenade by about 60 degrees.
Then, it will be fixed with a gap at the top, so you can put a BB bullet in it.

あとは上で書いたとおり、
・上下を抑える
・下から飛び出たボルトを押し上げる
・安全装置を噛ませる
これで再度使用できるようになります。
The rest, as I wrote above.
Hold up and down.
Push up the bolts that protrude from the bottom.
I'll bite the safety device.
Now you can use it again.
★ワイヤー式にする場合★
エンリケさん(@seburo47)が安全装置解除用のたこ紐をワイヤー式にしておりましたので、こちらについても紹介したいと思います。
If you want to use the wire method
Enrique (@seburo47) had a wired string for the safety release. So I'd like to introduce this one as well.

用意したのはこちら
・ 1mm径のワイヤーロープ https://www.monotaro.com/p/1749/3263/?displayId=5
・ ワイヤーローブスリーブ https://www.monotaro.com/p/0354/5997/?displayId=5
・ ジュラコンスペーサー https://www.monotaro.com/p/4294/3031/?displayId=5
まず安全装置にワイヤーを通します。
Here's what I've prepared.
1mm diameter wire rope https://www.monotaro.com/p/ 1749/3263/?displayId=5
Wire lobe sleeve https://www.monotaro.com/p/0354 /5997/?displayId=5
DURACON Spacer https://www.monotaro.com/p/4294/ 3031/?displayId=5
The first step is to run the wire through the safety device.

スリーブでカシメて固定します。
Caulk with a sleeve to secure it in place.

ワイヤーの長さをこれくらいで一度切ります。
Cut the length of the wire once about this long.

本体にピンを取り付ける際にジュラコンスペーサーをつけます。
The DURACON spacers are attached to the main body when installing the pins.

通常の手順で組み立てた後、底部から出ているワイヤーでわっかを作ります。
After assembling it in the usual way, make a ring with the wires from the bottom.

握り玉にこういう感じで紐を取り付けます。
Attach the string to the grip ball like this.

握り玉の紐を先ほど作ったわっかに同じ形で取り付けます。
Attach the string of the grip ball to the ring you just made in the same way.

ワイヤーのわっかはギリギリで作った方が外から見えないのでいいかなぁと思います。
I think it would be better to make the wire ring at the edge so it won't be visible from the outside.

★作例集について★
こちらの記事で他の方が仕上げた柄付き手榴弾を紹介しています。
ステンシルを入れたり表面の文字を消したり、個性の光る作品がありますので是非ご覧ください。
https://jshardware.militaryblog.jp/e1032841.html
About the Example Collection
You can see some of the patterned grenades that others have finished here.
Please take a look at the stencils, erase the text on the surface, and other unique pieces! .
https://jshardware.militaryblog.jp/e1032841 .html
★トラブルシューティング★
1 安全装置と起爆円盤の関係について
下の図のような形で入ります。
たぶん無理だとは思いますが、赤丸の押す部分まで入れようとしないでください。
Troubleshooting
1 The relationship between safety devices and detonating disks
It goes in as shown in the diagram below.
You probably can't do it, but don't try to get in until you get to the part of the red circle that you press.

2 安全装置が固すぎて紐で起爆できない
3Dプリントの誤差&T238の製造誤差で赤丸部分の余裕がないことが原因です。
2 The safety device is too hard to detonate with a string.
This is due to a 3D printing error & T238 manufacturing error, and there is no room for the red circled area.

その場合の対処法は以下の通りです。どちらかで隙間を作ることで解決します。
(1)1で示した安全装置の押す部分上面をやすり等で削る。
(2)下の写真のようにT238本体と下部パーツの間にM3ワッシャーを噛ませる。
If this is the case, here's what to do You can solve this problem by making a gap with either of the following methods.
(1)Scrape off the upper surface of the safety device pushing part shown in 1.
(2)Insert the M3 washer between the T238 body and the lower part as shown in the picture below.

まず最初にこちらの動画をご覧ください。
Domo, this is Juliette.
First of all, see this video.
何とかしてサバゲーで使える柄付き手榴弾を作れないかと考えて5年くらい・・
T238グレネードと出会ったことでその構想が一気に進みました。
キットの形で販売中ですので、興味のある方はDM等で連絡ください。
では購入者様向け組み立て方の説明に入ります。
用意していただくのはこんな感じです。
I've been trying to figure out how to make a stick grenade that can be used in Air-Soft for about 5 years...
When I met the T238 grenade, the idea went through the roof.
Now, let's go to the explanation of how to assemble the kit.
This is what you need to prepare.

左から
・ ハンマー&ピンポンチ(細い+ドライバー等でも可)
・ 六角レンチ(サイズ2.5)
・ たこ糸(1.2mm程度のもの)
・ イス足キャップ
・ 柄(外径34cm長さ28cmで内径1.5cm以上のパイプ、マイクロエース社のコンバットセットでも可)
・ T238グレネード
・ 3Dプリンタパーツ
From left to right.
Hammer and pin punch
Hexagonal wrench (size 2.5)
String (about 1.2mm)
Chair foot cap
handle (a pipe with an outer diameter of 34 cm and a length of 28 cm and an inner diameter of 1.5 cm or more. If you want you can purchase here)
T238 grenade.
3D printer parts
まずT238グレネードの安全ピンを外して起爆させます。
その後、上部にある3つのボルトを六角レンチで外して外せるパーツをすべて外します。
ボルトと、クリップ状のパーツは後から使います。
次に安全レバーの軸になっている棒をピンポンチで抜きます。
レバーは不要ですが、軸になっていた棒は使うのでなくさないようにしてください。
First, remove the safety pin on the T238 grenade to detonate it.
Then remove all the parts that can be removed by removing the three bolts at the top with an Allen wrench.
The bolts and the clip-like parts will be used later.
Next, use a pin punch to pull out the rod that is the shaft of the safety lever.
You don't need a lever, but don't lose the bar that was used as a shaft because you'll use it.

次に3Dプリンタパーツの安全装置にたこ糸を付けます。
つけ方は自由ですがハングマンズノットとかがきれいに取り付けられるような気がします。
The next step is to attach the string to the safety device of the 3D printer parts.
You can use any way you want, but I think Hangman's Knot or something like that can be used to attach it nicely.

安全装置をT238本体のレバーがあった場所に設置します。
設置したら『安全ピンを刺す方の穴』に先ほど外した安全レバーの軸を入れてください。
Install the safety device in the place where the lever on the main body of T238 was located.
Once installed, insert the shaft of the safety lever you removed earlier into the hole for the safety pin.

※図ではバーが出ていますが、完全に差し込んでください。
The bar is shown in the photo, but please insert it completely.
次に3Dプリンタのパーツを取り付けます。
下の写真で見えている部分が上です。
Next, install the 3D printer parts.
The part you see in the picture below is the top.

こんな感じで取り付けます。
Install it like this.

次に下部パーツに最初に取り外したクリップ状のパーツを取り付けます。
ネジは緩めておいた方が取り付けやすいですし、この後の作業が楽です。
Next, install the clip part you removed from the lower part first.
It's easier to loosen the screws to make the installation easier, and it's easier to work after this.

この時、クリップの六角ボルトの穴が切り欠き側にあるようにしてください。
向きを逆につけてしまうと、起爆時間の調整が出来なくなります。
At this time, make sure that the hole in the clip's hexagonal bolt is on the notch side.
If the direction is reversed, you will not be able to adjust the detonation time.

次のこの上部パーツを取り付けます。
Install this top part next.

こんな感じで、安全装置につけた紐が下から上に抜けるように通してください。
Pass it through like this so that the string attached to the safety device can be pulled out from the bottom to the top.

次に最初に外したボルトで上部パーツ、下部パーツを本体に取り付けます。
穴がきついので、入らない場合は押しながら回してください。
ボルトの頭が溝に完全に埋まるようにください。
Next, attach the upper part and the lower part to the main body with the bolts you removed first.
The hole is tight, so if it doesn't fit, push and turn it.
Please make sure that the head of the bolt is completely buried in the groove.

次に本体の羽根部分を格納して、上下から押さえつけます。
※写真を撮る都合から、爆発しないようにベルトを巻いてます。
Next, I retract the blades and press them down from above and below.
I put a belt around it to prevent it from exploding for the sake of taking pictures.

上下から押さえると、下からボルトが飛び出してきますので、これを押し込みます。
If you press down on it from above and below, the bolt will pop out from underneath, so push it in.

この時、ボルトの動きに合わせて、上にある灰色の円盤状の起爆装置が上下することがわかります。
ボルトを押す前 起爆装置が下がっている図
At this point, the gray disc-shaped detonator on top can be seen to move up and down as the bolt moves Before pressing the bolt
Before pressing the bolts Detonator in the lowered position

ボルトを押しこみ後 起爆装置が上がっている図
Detonator is raised after the bolt is pushed in.

起爆装置が上がったならば、安全装置を奥に押し込みます。
起爆装置の円盤が下がらないようにくさびを打ち込むような感じです。
Once the detonator is up, push the safety device into the back.
It's like driving a wedge into the detonator's disk to keep it from going down.

なお販売タイプの安全装置は操作しやすいように形を変えた関係で、起爆装置の上下が見えないかもしれませんが、手順は同じです。
これで撃発準備はできました。
紐を強く引けば安全装置が外れて、起爆装置が下がり、グレネードが作動します。
作動時間はクリップのボルトを締め付け具合で調整してください。
In addition, the safety devices for sale have been reshaped to make them easier to operate, so you can't see the top and bottom of the detonator. Maybe, but the procedure is the same.
You are now ready to fire.
If you pull the string hard, the safety is released, the detonator is lowered, and the grenade is activated.
Adjust the activation time by tightening the clip bolts.

次に柄に柄接続部を取り付けます。
柄接続部には4か所3mmの穴を開けてあります。
木ネジ、釘、接着剤などお好みの方法で柄に固定してください。
Next, attach the handle connection to the handle.
Four 3mm holes are drilled in the handle connection.
Attach to the handle using wood screws, nails, glue, or any other method you prefer.


本体の紐を柄に通します。
Thread the string of the body through the handle.

柄接続部と本体の上部のネジ部分を合体させます。
そして柄の反対の端にイス足キャップを取り付けたら完成です。
紐の握り玉?部分などはお好きな部品を使ってください。
塗装等も黒やフィールドグレイなど自分の考えるM24カラーにするのがよいでしょう。
Join the handle connection part and the top screw part of the body.
Then attach the chair foot cap to the other end of the handle and you're done.
A grip ball You can use your favorite parts.
It is better to use your own color such as black or field gray.

現在は柄とT238グレネードの供給が間に合っていないため、ツイッターでの受注販売をしております。
余剰が出来た時はラクマまたはメルカリで販売してます。
また、オプションで握り玉と底の部分をボトル缶キャップにするグレードアップパーツを販売中です。
フル装備するとこんな感じになります(未塗装ですが・・・)
Also, optional upgrade parts are now available to turn the grip ball and bottom part into a bottle can cap! It is.
This is what it looks like when fully equipped (unpainted...)


グレネードキット、補修パーツ等こちらで販売しております!
https://js-hardware.booth.pm/items/2587650
補足でBB弾の入れ方を説明します。
起爆した後、羽をたたみます。
※写真では撮影のためバンドをつけています。
I'll explain how to put the BB bullets in the supplement.
After detonation, fold the wings.
In the photo, a band is attached for the purpose of filming.

この状態で、底の部分(写真でいう左)だけを羽に噛ませて、上の部分(写真でいう右)の部分を60度ぐらいひねります。
そうすると上の部分に隙間が出来た状態で固定されますので、BB弾を入れることが出来ます。
In this state, only the bottom part (left in the picture) is chewed into the wings, and the top part (right in the picture) Twist the top of the grenade by about 60 degrees.
Then, it will be fixed with a gap at the top, so you can put a BB bullet in it.

あとは上で書いたとおり、
・上下を抑える
・下から飛び出たボルトを押し上げる
・安全装置を噛ませる
これで再度使用できるようになります。
The rest, as I wrote above.
Hold up and down.
Push up the bolts that protrude from the bottom.
I'll bite the safety device.
Now you can use it again.
★ワイヤー式にする場合★
エンリケさん(@seburo47)が安全装置解除用のたこ紐をワイヤー式にしておりましたので、こちらについても紹介したいと思います。
If you want to use the wire method
Enrique (@seburo47) had a wired string for the safety release. So I'd like to introduce this one as well.

用意したのはこちら
・ 1mm径のワイヤーロープ https://www.monotaro.com/p/1749/3263/?displayId=5
・ ワイヤーローブスリーブ https://www.monotaro.com/p/0354/5997/?displayId=5
・ ジュラコンスペーサー https://www.monotaro.com/p/4294/3031/?displayId=5
まず安全装置にワイヤーを通します。
Here's what I've prepared.
1mm diameter wire rope https://www.monotaro.com/p/ 1749/3263/?displayId=5
Wire lobe sleeve https://www.monotaro.com/p/0354 /5997/?displayId=5
DURACON Spacer https://www.monotaro.com/p/4294/ 3031/?displayId=5
The first step is to run the wire through the safety device.

スリーブでカシメて固定します。
Caulk with a sleeve to secure it in place.

ワイヤーの長さをこれくらいで一度切ります。
Cut the length of the wire once about this long.

本体にピンを取り付ける際にジュラコンスペーサーをつけます。
The DURACON spacers are attached to the main body when installing the pins.

通常の手順で組み立てた後、底部から出ているワイヤーでわっかを作ります。
After assembling it in the usual way, make a ring with the wires from the bottom.

握り玉にこういう感じで紐を取り付けます。
Attach the string to the grip ball like this.

握り玉の紐を先ほど作ったわっかに同じ形で取り付けます。
Attach the string of the grip ball to the ring you just made in the same way.

ワイヤーのわっかはギリギリで作った方が外から見えないのでいいかなぁと思います。
I think it would be better to make the wire ring at the edge so it won't be visible from the outside.

★作例集について★
こちらの記事で他の方が仕上げた柄付き手榴弾を紹介しています。
ステンシルを入れたり表面の文字を消したり、個性の光る作品がありますので是非ご覧ください。
https://jshardware.militaryblog.jp/e1032841.html
About the Example Collection
You can see some of the patterned grenades that others have finished here.
Please take a look at the stencils, erase the text on the surface, and other unique pieces! .
https://jshardware.militaryblog.jp/e1032841 .html
★トラブルシューティング★
1 安全装置と起爆円盤の関係について
下の図のような形で入ります。
たぶん無理だとは思いますが、赤丸の押す部分まで入れようとしないでください。
Troubleshooting
1 The relationship between safety devices and detonating disks
It goes in as shown in the diagram below.
You probably can't do it, but don't try to get in until you get to the part of the red circle that you press.

2 安全装置が固すぎて紐で起爆できない
3Dプリントの誤差&T238の製造誤差で赤丸部分の余裕がないことが原因です。
2 The safety device is too hard to detonate with a string.
This is due to a 3D printing error & T238 manufacturing error, and there is no room for the red circled area.

その場合の対処法は以下の通りです。どちらかで隙間を作ることで解決します。
(1)1で示した安全装置の押す部分上面をやすり等で削る。
(2)下の写真のようにT238本体と下部パーツの間にM3ワッシャーを噛ませる。
If this is the case, here's what to do You can solve this problem by making a gap with either of the following methods.
(1)Scrape off the upper surface of the safety device pushing part shown in 1.
(2)Insert the M3 washer between the T238 body and the lower part as shown in the picture below.

2020年06月17日
RGD-33 ヤオ・リー柄付き手榴弾について
ドーモ、ジュリエットです。
以前ツイッターで紹介した、中国製柄付き手榴弾がついに届きました!

元のツイート⇒https://twitter.com/JS_Hardware/status/1266122868888236033
袋には使い方が印刷されています。
届いてみた感想は「あれ、小さくない・・・?」
試しに我が家にある手榴弾たちと比べてみました。

左から
T238グレネード
GR02グレネード(柄付き改造パーツ付き)
RGD-33 ヤオ・リー手榴弾
T238 日本軍式手榴弾
T238 M24柄付き手榴弾
やっぱりめちゃくちゃ小さいです。
寸法を測ってみました。

長さは15cmくらい(ちなみに底部の黒い部分は塗分けてあるだけで外れません)

弾頭長さが6cmくらい

弾頭直径が4.8cm

柄の直径が2.5cm

起爆状態で直径15cmくらい
こんな感じです。

重さは100gです
構造はほとんどGR02グレネードと同じです。

弾頭部から弾を入れられます。何発入るかは未確認です。

安全装置はこんな感じ。

ピンを抜くとタブみたいな部分が動くようになり、中の鉄球の固定が解除されて起爆可能になります。
次に分解してみます。

3つのネジを外すと柄の部分が外れます。柄はもちろん中空です。
新たに3つのネジが現れます。ほとんどGR02グレネードの小型版であることがわかります。

このネジも外すと弾頭上部が取り外せます。安全装置の鉄球構造もGR02と全く同じです。

ここからスプリングつきの羽根が外せますが、以後は省略します。
BB弾は入れていないですが起爆させた動画はこちらのツイートをご覧ください。
https://twitter.com/JS_Hardware/status/1273227128356519936
この手榴弾を見つけた時は「ついに中国様が柄付き手榴弾業界に進出された!」と衝撃を受け、
しかも「赤軍勢」「ナム勢」向けのチョイスもなかなか鋭いと思っていました。
これはもうわが兵器局の柄付き手榴弾事業はおしまいだなと覚悟もしていました。
ただ届いたRGD-33 ヤオ・リー手榴弾はちょっと小さくて、価格相応のチープさは否めないものです。
リアルウッドでもっと重厚な手榴弾をご希望の方はぜひ当兵器局のM24グレネードをご検討下さい!(宣伝)
M24柄付き手榴弾(時限式)⇒https://jshardware.militaryblog.jp/e1019823.html
M24柄付き手榴弾(インパクト式)⇒https://jshardware.militaryblog.jp/e1026753.html
それでは~
2020年05月28日
サバゲー用M24手榴弾における作例集
ドーモ、ジュリエットです。
以前紹介して現在販売中のM24柄付き手榴弾の作例について紹介します。
●ロンメルさん(@su9vKVSfS0iEDLS)の作品

フィールドグレイに塗られて、弾頭部分にステンシルが入っています!
T238にちょうどあうサイズのデカールはないので、手書きで書かれたとのことです。
塗装しただけのものに比べて、ステンシルを入れることで一気にリアリティが上がっています。
ステンシルを入れるためにパテでT238のモールド等は事前に埋められています。

現在は別売りの握り玉とボトル缶キャップキットを取り付けたことによりさらにリアリティが向上しているようです。

●エンリケさん(@seburo47)の作品

こちらもフィールドグレイに塗装され、ステンシルが入っています。
特徴的なのはあえて接続部分の色を変えてあることです。
接続部分が実物に比べて長くなってしまっているので、ここの色を変えることでその違和感を和らげているのは見事です。
色についてはフィールドグレイとジャーマングレイの混色で塗ってあるとのことです。

エンリケさんの作品のユニークなところはもう一つあります。

こちらを見ていただけるとわかりますが、手榴弾の内側をオキサイドレッドで塗装することにより、起爆時のインパクトが増すように工夫されています。
また起爆用の紐が切れやすい問題を解決するために、安全装置を引っ張る部分についてはステンレスワイヤーとジュラコンによる滑車に交換されています。

ちなみにこちらの作品はボトル缶キャップキット発売前に自前でキャップ式にに交換されていたりもします。

いかがだったでしょうか。
作者の私よりも素晴らしいグレネードが誕生しており、うれしい限りです。
既にお持ちの方も購入を検討されている方も、今回紹介した方々の作品が何かの参考になれば幸いです。
それでは!
2020年04月21日
サバゲー用旧日本軍手榴弾 Imperial Japanese Army grenades for airsoft
ドーモ、ジュリエットです!
これまで当兵器局では2つの柄付き手榴弾をリリースしました。
今回ご紹介するのは旧日本軍式の手榴弾になります。
まずはこちらの動画をご覧下さい。
Domo, it's Juliette!
So far, the Weapons Department has released two stick grenades.
The one we're going to introduce here is the imperial Japanese Army style grenade.
The first one can be seen in this video.
今回のグレネードは上部を叩くことにより撃発します。
もちろん、T238のタイマー機能はそのままなので撃発した後、一定時間後に起爆します。
それでは組み立て方を紹介します。
This time, the grenade is fired by hitting the top of the grenade.
Of course, the T238 has the same timer function as the T238, so the grenade will detonate after a certain time after firing.
Now, let's see how to assemble it.

必要なものは以下の通りです。
● T238グレネード
● 3Dプリンタパーツ
● 六角レンチ(サイズ2.5のもの。)
You will need the following.
T238 grenades.
3D printer parts
Hexagonal wrench (size 2.5)
それでは組み立ての入ります。
まずこの信管覆いパーツを上部パーツに取り付けます。
画像赤丸の信管覆いの内側ポッチと、上部パーツの溝をあわせます。
Now let's start the assembly.
First, attach the fuse cover to the upper part.
Match the inner potch of the fuse cover and the groove of the upper part.

縦方向に押し込んだあと、上から見て時計回りに30°ほど回転させます。
※最初は固い場合があります。その場合は滑らかに動くまで何度か動かして下さい。
Push it in vertically and then rotate it clockwise by 30 degrees, looking from the top.
It may be hard at first. In this case, move it several times until it moves smoothly.
こんな感じで下まで下がるようになったら上部は完成です。
When you can get it down to the bottom like this, the top is complete.

つぎにT238グレネードを分解します。
一度起爆させたのち、上部を止めているボルト3つを外します。このボルトは後で使うので取っておいてください。
時間調整用のクリップ、その下の台座部分を取り外します。
次にポンチでレバーを取り外します。
Next, disassemble the T238 grenade.
After detonating the grenade, remove the 3 bolts holding the upper part of the grenade. Keep this bolt for later use.
Remove the time adjustment clip and the base part under it.
Next, remove the lever with a punch.

次に3Dプリンタパーツの下部を取り付けます。
Next, install the lower part of the 3D printer part.
3Dプリンタパーツの安全装置と先ほど取り外したクリップを取り付けます。
クリップについては赤矢印側に六角ボルトの穴が来るようにしてください。
そうしないとあとから起爆時間の調整が出来なくなります。
Install the safety device of the 3D printer parts and the clip that was removed earlier.
As for the clip, make sure that the hole of the hexagon bolt is on the red arrow side.
Otherwise you will not be able to adjust the detonation time later.
次に上部パーツを取り付けて、先ほど外したボルトで固定します。
Next, install the top part and secure it with the bolts you just removed.

これで完成です。次に使い方について説明します。
羽根をたたんだ状態でそこから飛び出ているボルトを押し上げます。
(写真では撮影のためベルトで固定していますが、実際は手で握りながらで行えます)
Now you're done. Next, let me explain how to use it.
With the wings folded, push up the bolt.
(In the photo, it's fixed with a belt for the purpose of taking a picture, but you can actually do it while holding it by hand.)

この状態で、下の部分だけを羽に噛ませて、上の部分を60度ぐらいひねります。
そうすると上の部分に隙間が出来た状態で固定されますので、BB弾を入れることが出来ます
In this state, bite only the bottom part into the wings and twist the top part about 60 degrees.
Then the upper part will be fixed with a gap in the upper part, so you can put BB bullets into it.

BB弾を入れ終わったら、上部のパーツを引き上げます。
Once you've finished putting in the BB bullets, pull up the top part.
その後、再度T238の上部を60度くらい回して、上下を抑え、下から飛び出たボルトを押し上げつつ、安全装置を押し込んで噛ませます。
Then turn the top of the T238 again about 60 degrees to hold the top and bottom down and push the safety in and engage the safety while pushing up the bolt that pops out from underneath.

これで準備は完了です。
あとは安全ピンを差し込むことでより安全に携行することが出来ます。
The preparation is now complete.
Now you can carry it more safely by inserting the safety pin.

よりリアルに仕上げたい人は直径2mmの真鍮線等を加工して安全ピンを自作することをおススメします。
真鍮線についてはこちらが安くていいと思います。
https://www.yodobashi.com/product/100000001003778213/
If you want to make it more realistic, we recommend you to make your own safety pin by processing 2mm diameter brass wire or the like.
黒で塗ってガンダムマーカーのゴールドで塗って、真鍮線で安全ピンつけた図がこれです。
日本軍装備は持ってないので中途半端で申し訳ないですが・・・
Here's a picture of it painted in black and painted in gold, with a safety pin attached with brass wire.
I don't have any Japanese military equipment, so I apologize for the halfway point...

起爆方法についてはツイートの動画の通りです。
販売についてはラクマ、メルカリに不定期に出品します。
ラクマ
https://fril.jp/shop/js_hardware
メルカリ
https://www.mercari.com/jp/u/620228204/
確実に入手したい方は私のツイッターまでDM下さい。
★トラブルシューティング★
1 安全装置のリングについて
落下防止用に糸をつけるために作成したが、実際のところ特に意味はありません。
2 その他
M24柄付き手榴弾の記事を参照ください。
https://jshardware.militaryblog.jp/e1019823.html
これまで当兵器局では2つの柄付き手榴弾をリリースしました。
今回ご紹介するのは旧日本軍式の手榴弾になります。
まずはこちらの動画をご覧下さい。
Domo, it's Juliette!
So far, the Weapons Department has released two stick grenades.
The one we're going to introduce here is the imperial Japanese Army style grenade.
The first one can be seen in this video.
今回のグレネードは上部を叩くことにより撃発します。
もちろん、T238のタイマー機能はそのままなので撃発した後、一定時間後に起爆します。
それでは組み立て方を紹介します。
This time, the grenade is fired by hitting the top of the grenade.
Of course, the T238 has the same timer function as the T238, so the grenade will detonate after a certain time after firing.
Now, let's see how to assemble it.

必要なものは以下の通りです。
● T238グレネード
● 3Dプリンタパーツ
● 六角レンチ(サイズ2.5のもの。)
You will need the following.
T238 grenades.
3D printer parts
Hexagonal wrench (size 2.5)
それでは組み立ての入ります。
まずこの信管覆いパーツを上部パーツに取り付けます。
画像赤丸の信管覆いの内側ポッチと、上部パーツの溝をあわせます。
Now let's start the assembly.
First, attach the fuse cover to the upper part.
Match the inner potch of the fuse cover and the groove of the upper part.

縦方向に押し込んだあと、上から見て時計回りに30°ほど回転させます。
※最初は固い場合があります。その場合は滑らかに動くまで何度か動かして下さい。
Push it in vertically and then rotate it clockwise by 30 degrees, looking from the top.
It may be hard at first. In this case, move it several times until it moves smoothly.

こんな感じで下まで下がるようになったら上部は完成です。
When you can get it down to the bottom like this, the top is complete.

つぎにT238グレネードを分解します。
一度起爆させたのち、上部を止めているボルト3つを外します。このボルトは後で使うので取っておいてください。
時間調整用のクリップ、その下の台座部分を取り外します。
次にポンチでレバーを取り外します。
Next, disassemble the T238 grenade.
After detonating the grenade, remove the 3 bolts holding the upper part of the grenade. Keep this bolt for later use.
Remove the time adjustment clip and the base part under it.
Next, remove the lever with a punch.

次に3Dプリンタパーツの下部を取り付けます。
Next, install the lower part of the 3D printer part.

3Dプリンタパーツの安全装置と先ほど取り外したクリップを取り付けます。
クリップについては赤矢印側に六角ボルトの穴が来るようにしてください。
そうしないとあとから起爆時間の調整が出来なくなります。
Install the safety device of the 3D printer parts and the clip that was removed earlier.
As for the clip, make sure that the hole of the hexagon bolt is on the red arrow side.
Otherwise you will not be able to adjust the detonation time later.

次に上部パーツを取り付けて、先ほど外したボルトで固定します。
Next, install the top part and secure it with the bolts you just removed.

これで完成です。次に使い方について説明します。
羽根をたたんだ状態でそこから飛び出ているボルトを押し上げます。
(写真では撮影のためベルトで固定していますが、実際は手で握りながらで行えます)
Now you're done. Next, let me explain how to use it.
With the wings folded, push up the bolt.
(In the photo, it's fixed with a belt for the purpose of taking a picture, but you can actually do it while holding it by hand.)

この状態で、下の部分だけを羽に噛ませて、上の部分を60度ぐらいひねります。
そうすると上の部分に隙間が出来た状態で固定されますので、BB弾を入れることが出来ます
In this state, bite only the bottom part into the wings and twist the top part about 60 degrees.
Then the upper part will be fixed with a gap in the upper part, so you can put BB bullets into it.

BB弾を入れ終わったら、上部のパーツを引き上げます。
Once you've finished putting in the BB bullets, pull up the top part.

その後、再度T238の上部を60度くらい回して、上下を抑え、下から飛び出たボルトを押し上げつつ、安全装置を押し込んで噛ませます。
Then turn the top of the T238 again about 60 degrees to hold the top and bottom down and push the safety in and engage the safety while pushing up the bolt that pops out from underneath.

これで準備は完了です。
あとは安全ピンを差し込むことでより安全に携行することが出来ます。
The preparation is now complete.
Now you can carry it more safely by inserting the safety pin.

よりリアルに仕上げたい人は直径2mmの真鍮線等を加工して安全ピンを自作することをおススメします。
真鍮線についてはこちらが安くていいと思います。
https://www.yodobashi.com/product/100000001003778213/
If you want to make it more realistic, we recommend you to make your own safety pin by processing 2mm diameter brass wire or the like.
黒で塗ってガンダムマーカーのゴールドで塗って、真鍮線で安全ピンつけた図がこれです。
日本軍装備は持ってないので中途半端で申し訳ないですが・・・
Here's a picture of it painted in black and painted in gold, with a safety pin attached with brass wire.
I don't have any Japanese military equipment, so I apologize for the halfway point...

起爆方法についてはツイートの動画の通りです。
販売についてはラクマ、メルカリに不定期に出品します。
ラクマ
https://fril.jp/shop/js_hardware
メルカリ
https://www.mercari.com/jp/u/620228204/
確実に入手したい方は私のツイッターまでDM下さい。
★トラブルシューティング★
1 安全装置のリングについて
落下防止用に糸をつけるために作成したが、実際のところ特に意味はありません。
2 その他
M24柄付き手榴弾の記事を参照ください。
https://jshardware.militaryblog.jp/e1019823.html
2020年04月04日
サバゲー用M24柄付手榴弾(GR02) M24 Stick Grenades for Air-Soft(GR02))
ドーモ、ジュリエットです。
まず最初にこちらの動画をご覧ください。
T238の時限式に引き続き、GR02を使用した、インパクト式の柄付き手榴弾を作成しました。
では購入者様向け組み立て方の説明に入ります。
組み立て方についてはイワ師さん(@820tarou820siw)からの情報を活用させていただいております。
★注意★
塗装後に撮った写真と未塗装の写真が入り混じっています。
柄の形状が煙幕手榴弾型とM24型入り混じっています。
組み立てに際して特に問題はないので、脳内補完していただくようお願いします。
【用意するもの】
用意していただくのはこんな感じです。

左から
・ ハンマー&ピンポンチ(細い+ドライバー等でも可)
・ たこ糸等(丈夫なものの方がいいです。)
・ P6サイズのOリング×2
・ M3×20mmの六角穴付きボルト(注 写真は15mmの付属のネジです。これだと長さが足りず分解します。)
・ 3Dプリンタパーツ
・ GR02グレネード
・ 柄(外径34cm長さ28cmで内径1.5cm以上のパイプ、マイクロエース社のコンバットセットでも可)
以下画像に入れ忘れた物
・ 六角レンチ
・ 3Dプリンタ製ボトル缶接続部
・ ボトル缶キャップ
・ 握り玉
【安全装置の組み立てと調整】
まず安全装置の強さを調整します。
写真のように棒状の安全装置にOリングとたこ紐を取り付けます。

紐の長さは柄に対してこれくらいです。紐は必ずわっか状にしてください。
安全装置への取り付けは写真のようにリングに通してもいいですし・・・・

写真のように取り付けてもどちらでもいいです。

この状態でまずネジ穴がある、GR02側の3Dプリンタパーツに差し込みます。

次に柄側の3Dプリンタパーツをねじ込んで合体させます。

下から見るとこんな感じで、Oリングが見えるのが正しい状態です。

この状態で紐を引っ張り、抜ける強さを確かめます。
3Dプリンタ特有のざらつきがあるため、最初は固く、紐がちぎれることもあるかもしれません。
何度か抜き差しするか、それでもダメな場合は図の赤丸部分を少しずつカッター等で削ることで調整してください。
また、Oリングの数を減らすことでも調整できます。

【弾頭部の組み立て】
引き抜き強さの調整が終わったらGR02本体に組付けていきます。
まず、ピンポンチでレバーの軸を取り除きます。

次にGR02の本体についている3つのネジを外し、付属のM3×20mmのネジで止めていきます。

安全装置を取り付けてみて、ちゃんと起爆球が固定されていることを確認します。
赤丸のように起爆球の上のポッチが安全装置で見えなくなり、これで安定していれば大丈夫です。

【柄の組み立て】
次に柄に柄接続部パーツを取り付けます。
きつい場合は柄をやすりで削って調整してください。
柄との固定については木ネジを使うか、両面テープを柄に巻いてねじ込んでください。

柄の反対側に、ボトル缶キャップとの接続パーツを取り付けます。
こちらも木ネジか両面テープ等で固定してください。

【握り玉の組み立て】
握り玉に紐を取り付けます。
どのようなつけ方でもいいですが、紐がリング状になるようにしてください。
【柄への紐通し】
次に柄に紐を通していきます。
クリーニングロッドを使ってもいいですが、ここでは使わない場合のやり方を紹介します。
まず、柄の穴に安全装置の紐を入れていきます。
適当にぐいぐい押し込んでもらって結構です。

次にこの穴に口を近づけて勢い良く息を吹き込みます。
(画像では口をつける代わりにブロワーで表しています)

その勢いで底から紐が出てくるはずです。
上手くいかない場合は、もう一度息を吹き込むか、一度紐を引き上げて、再度入れなおしてください。

【握り玉の取り付け】
本体から出てきた紐に握り玉のわっかを取り付けます。

こんな感じになります。

【弾頭部の取り付け】
弾頭部を柄にねじ込みます。

画像は省略しますが、あとはボトル缶キャップでふたをしたら完成です。
★販売について★
Boothにて販売しております。
GR02も入ったフルセットのほか、既にGR02をお持ちで柄付き手榴弾にしたい方用のセットもあります。
よろしければご覧ください。
https://js-hardware.booth.pm/items/2587666
まず最初にこちらの動画をご覧ください。
T238の時限式に引き続き、GR02を使用した、インパクト式の柄付き手榴弾を作成しました。
では購入者様向け組み立て方の説明に入ります。
組み立て方についてはイワ師さん(@820tarou820siw)からの情報を活用させていただいております。
★注意★
塗装後に撮った写真と未塗装の写真が入り混じっています。
柄の形状が煙幕手榴弾型とM24型入り混じっています。
組み立てに際して特に問題はないので、脳内補完していただくようお願いします。
【用意するもの】
用意していただくのはこんな感じです。

左から
・ ハンマー&ピンポンチ(細い+ドライバー等でも可)
・ たこ糸等(丈夫なものの方がいいです。)
・ P6サイズのOリング×2
・ M3×20mmの六角穴付きボルト(注 写真は15mmの付属のネジです。これだと長さが足りず分解します。)
・ 3Dプリンタパーツ
・ GR02グレネード
・ 柄(外径34cm長さ28cmで内径1.5cm以上のパイプ、マイクロエース社のコンバットセットでも可)
以下画像に入れ忘れた物
・ 六角レンチ
・ 3Dプリンタ製ボトル缶接続部
・ ボトル缶キャップ
・ 握り玉
【安全装置の組み立てと調整】
まず安全装置の強さを調整します。
写真のように棒状の安全装置にOリングとたこ紐を取り付けます。

紐の長さは柄に対してこれくらいです。紐は必ずわっか状にしてください。
安全装置への取り付けは写真のようにリングに通してもいいですし・・・・

写真のように取り付けてもどちらでもいいです。

この状態でまずネジ穴がある、GR02側の3Dプリンタパーツに差し込みます。

次に柄側の3Dプリンタパーツをねじ込んで合体させます。

下から見るとこんな感じで、Oリングが見えるのが正しい状態です。

この状態で紐を引っ張り、抜ける強さを確かめます。
3Dプリンタ特有のざらつきがあるため、最初は固く、紐がちぎれることもあるかもしれません。
何度か抜き差しするか、それでもダメな場合は図の赤丸部分を少しずつカッター等で削ることで調整してください。
また、Oリングの数を減らすことでも調整できます。

【弾頭部の組み立て】
引き抜き強さの調整が終わったらGR02本体に組付けていきます。
まず、ピンポンチでレバーの軸を取り除きます。

次にGR02の本体についている3つのネジを外し、付属のM3×20mmのネジで止めていきます。

安全装置を取り付けてみて、ちゃんと起爆球が固定されていることを確認します。
赤丸のように起爆球の上のポッチが安全装置で見えなくなり、これで安定していれば大丈夫です。

【柄の組み立て】
次に柄に柄接続部パーツを取り付けます。
きつい場合は柄をやすりで削って調整してください。
柄との固定については木ネジを使うか、両面テープを柄に巻いてねじ込んでください。


柄の反対側に、ボトル缶キャップとの接続パーツを取り付けます。
こちらも木ネジか両面テープ等で固定してください。

【握り玉の組み立て】
握り玉に紐を取り付けます。
どのようなつけ方でもいいですが、紐がリング状になるようにしてください。

【柄への紐通し】
次に柄に紐を通していきます。
クリーニングロッドを使ってもいいですが、ここでは使わない場合のやり方を紹介します。
まず、柄の穴に安全装置の紐を入れていきます。
適当にぐいぐい押し込んでもらって結構です。

次にこの穴に口を近づけて勢い良く息を吹き込みます。
(画像では口をつける代わりにブロワーで表しています)

その勢いで底から紐が出てくるはずです。
上手くいかない場合は、もう一度息を吹き込むか、一度紐を引き上げて、再度入れなおしてください。

【握り玉の取り付け】
本体から出てきた紐に握り玉のわっかを取り付けます。

こんな感じになります。

【弾頭部の取り付け】
弾頭部を柄にねじ込みます。

画像は省略しますが、あとはボトル缶キャップでふたをしたら完成です。
★販売について★
Boothにて販売しております。
GR02も入ったフルセットのほか、既にGR02をお持ちで柄付き手榴弾にしたい方用のセットもあります。
よろしければご覧ください。
https://js-hardware.booth.pm/items/2587666
2019年09月18日
T238グレネードとクリップ T238 Grenade and Timerclip
第1弾の投稿から二次大戦モノじゃないのはお許しくださいm(_ _)m
今回は最近入手したT238グレネードについて紹介します!
I'm going to share with you my recently purchased T238 grenade!

一応アマゾンでも取り扱いあるのですが、9月末現在欠品中です。
https://www.amazon.co.jp/dp/B07L5KJX5N
※ただGR02グレネードの時も最初は欠品がちだったので、そんなもんなのでしょう。
特徴としては
● スプリング式
● 時限式
であることです!
ここまでは他のブログや動画等でも流れているので、当ブログでは構造を紹介したいと思います。
It will be a yellow and grey, sci-fi looking grenade.
Features.
Spring type
Timed system
It is to be!
So far this has been played out in other blogs, videos, etc., so I'd like to introduce the structure in this blog!
それではさっそく分解してみましょう。
購入したT238グレネードには、箱はついていませんでしたが、分解&調整用の六角レンチがついていました。
これで上部の3つのネジを外すと・・・
So let's get on with it and take it apart.
The T238 grenade that I purchased did not come with a box, but it came with a hexagonal wrench for disassembly and adjustment. It was attached.
Now you can remove the three screws on top...

はい、こんな感じで外れました。左奥に写っているのが取り外した上部カバーです。
この灰色のクリップ状の部品が、T238の時限装置です。
上の写真では「レバーが上がっている=作動した」状態ですが、これをレバーを下げて作動前に持っていくと・・・
It came off like this. You can see the top cover in the back left corner.
This gray clip is the timing device of T238.
In the photo above, the lever is up, you can see that it has been activated.
But if you lower the lever, If you take it with you...

こんな感じでピンが飛び出します。
このピンが引っ込もうとするのを先ほどのクリップが抑え込むことによって遅延を発生させているのです。
クリップの部分はこんな感じです。
The pin will pop out like this.
When the pin tries to retract, the clip prevents it from being retracted and creates a delay. They are there.
This is what the Timerclip looks like.

中央の穴にゴム製のOリングが入っており、これを両側から抑える構造になっています。
抑える強さは六角ボルトで調整することができ、これによって遅延時間が変わるという仕組みなのです。
分かってしまえばなんということはないですが、ゴムによる摩擦で遅延を作り出す発想はなかったです。
時間の正確性はさがりますが、ゼンマイよりも単純で丈夫ですから合理的です。
レバーとピンについてはこんな感じで連動しています。
There is a rubber O-ring in the center hole, which is held in place from both sides.
The strength of the restraint can be adjusted with a hexagonal bolt, which changes the delay time. It is.
Once you understand it, it's not so bad, but the idea of creating a delay through friction with rubber never occurred to me. It is a good idea.
The accuracy of the time is less, but it is simpler and more durable than a spring, so it is more reasonable.
As for the levers and pins, they work together like this.

ここまでの紹介で概ね十分だと思うのですが、せっかくなのでこの先も分解してみました。
底の部分にも六角ボルトがあります。
I think the introduction so far is generally sufficient, but I took it apart again.
There are also hex bolts at the bottom.

これを外すと・・・
If I take these off...

こんな感じで外れます。
ちょっと見づらいですが、胴体部には強めのスプリングが入っており、このスプリングが上部と底部を開いて、撃発するようになっています。
全体を並べてみるとこんな感じです。
It comes off like this.
It's a little hard to see, but the body has a strong spring in it.
The bottom is open and ready to fire.
Here's what the whole thing looks like when you put it together.

文字で説明するのが難しいですが・・・
● 灰色のT238と書かれた胴体部は開こうとする。
● それを黄色の上部と底部が挟み込む形で抑えている。
● 上部と底部は中央のスプリングによって常に開こうとしている。
● 上部と底部が開くためには中央のピンがクリップから抜ける必要がある。
● クリップは六角ボルトによって締め付けられ、摩擦により、ピンを抑えている。
こんな感じですかね。
It's hard to explain in words, but...
1. The fuselage, marked T238 in grey, tries to open.
2. The yellow top and bottom are holding it in between.
3. The top and bottom are always trying to open by means of a central spring.
4. For the top and bottom to open, the central pin has to be pulled out of the clip.
5. The clip is tightened by a hexagonal bolt, which holds the pin in place by friction.
Webの記事などで不発とか数分経っても作動しないといわれていたりしますが、
クリップの六角ボルトを締めすぎていることが原因だと思われます。
ただ、六角ボルトが十分緩められていたとしても、ハンドルが本体の下に来た場合や、
ハンドルが開こうとするのを妨げるもの(壁とか落ち葉とか)があった場合は、
その力に負けてしまって作動しないこともあります。
なので、私はハンドルを切り取ってしまおうと画策中です。
It's said to be a dud, or not working after a few minutes, in articles on the web.
It may be due to over-tightening the hex bolts on the clip.
However, even if the hex bolt is sufficiently loosened, if the handle comes underneath the body,
or if the handle If there is something (such as a wall or a fallen leaf) that prevents it from trying to open,
it will lose its power and It may not work.
それと中華プラスチックの悲しさか、クリップ部が割れてしまいました。
スペアパーツの入手も絶望的なのでこんなものを作ってみました。
元のパーツにあった謎のデザインを排除し、塊感あふれる形状にしたので丈夫です。
もしT238を入手して壊れた場合はこちらで販売していますので、よろしければお求めください。
https://js-hardware.booth.pm/items/2713896
That and the sadness of Cheap plastic, the clip part was broken.
I made this one because I'm desperate for spare parts.
If you have a T238 and it is broken, you can buy it here. (ShapeWays)
http://shpws.me/S0qd
またT238を利用したM24柄付き手榴弾についても作成しましたのでよろしければご覧ください。
https://jshardware.militaryblog.jp/e1019823.html
こちらはT238を利用した旧日本軍九九式手榴弾です。
https://jshardware.militaryblog.jp/e1027329.html
I have also made an M24 Stick Grenade with a T238, if you would like to see it. Please give me a copy.
https://jshardware.militaryblog.jp/e1019823.html
This is an old Japanese army type 99 grenade using T238.
https://jshardware.militaryblog.jp/e1027329.html
2020/3/30追記
Oリングですが内径が2.4mm、線径が2.3mmという独自っぽいものが使われています。
一番身近なP規格で試したところ、P3が使えました。ただ線径が細いこともあり、私の個体の場合は最大まで締めても4秒くらいの遅延までしかできませんでした。
https://www.packing.co.jp/ORING/oring-size/id-1-size.htm
上のサイトを見るに、G-3の方がもっといい結果が出るかもしれません。また機会があったら試してみます。
下の写真は左側がオリジナル、右がP3です。

2020/4/4追記
新たにふたつのOリングを購入してみた。
左からオリジナル、AS103、AS104
AS103はギリギリ使えるかもしれないレベル、AS104はサイズ的にクリップに収まらなかった。
まだまだ代替Oリング探しは続きそう・・・
